Showing posts with label Contemporary. Show all posts

Sunday, September 10, 2017

Frank Stella

Frank Stella, Harran II, 1967

Artist: Frank Stella

Materials:
paper, sharpies, markers, circle templates from cardboard or lids of various sizes (or protractors), scissors (or, even better, a small paper cutter), construction paper, glue

Frank Stella is a contemporary artist still working and living in New York City. He was born in 1936 and graduated from Princeton. Stella started his career making non-representational art (art that's not meant to mean anything other than what it is on the surface: a calculated combination of elements like line, color, and shape). He gained early acclaim in his career, as the Museum of Modern Art in New York City purchased a painting from him when he was only 23. He has made many important series of paintings over the years, including a series of black line paintings (the Black Paintings), and colorful, flat paintings made with bright colors using protractors (the Protractor Series).  See this powerpoint presentation (made by educators from the public schools of Robeson County) for more information.

Activity:

(*This is a project that I found at artroomblog - thank you for a great lesson!) 

Using the powerpoint slideshow, introduce the kids to the work of Frank Stella. The slideshow is LONG and is largely for you to get a familiarity with the artist. Instead of trying to go through the whole thing with the kids, I would suggest choosing just maybe three slides to focus on (the ones most relevant to this lesson are at the end - from the Protractor Series), asking our discussion questions: what do you see? what makes you say that? what more can you find? Things to draw out in the discussion could be:
-what elements of art does Mr. Stella use? (line, color, shape)
-do the paintings look like they are moving?
-do you see any repetition in the art? (when something, like a line or color, is used over and over)

Using sharpies, have the kids create a geometric design using either the circles/lids, or protractors (protractors might be a great option for older grades). Then, have them color the shapes in with markers (they should take care to not use the same colors right next to each other).

After it is all colored in you can, depending on time, either leave it like this:

OR, cut the piece into fours (this would be great if you had an extra adult and a small paper cutter!), and then have the child glue the pieces on a piece of colored construction paper, rotating their images to find a combination they like, creating an end result like this:


SaveSave

Monday, November 14, 2016

Andy Goldsworthy: Noticing Nature

Installation, by Andy Goldsworthy


(by a group of 2 kindergartners)

About the Artist: Andy Goldsworthy is a contemporary installation artist who lives in Scotland. Before going to art school he spent time working on a farm in England, and grew to feel that farming was a way of literally shaping the earth, just like artists shape clay. His career has been an elaboration of this idea: he has created a body of work full of pieces both transient and permanent, using nature as his medium. Here's a 3 minute video of him working on youtube... could be really fun for the kids to see (actually, youtube has TONS of these on Goldsworthy, so if you have some time, you might want to check out more of them). here is the slideshow.

Andy Goldsworthy is a great artist to discuss because his work gives us an opportunity to talk about one of the most important skills an artist can have: the ability to notice the world.

Supplies: a camera, a bunch of natural things (I used: white beans, split peas, berries off an ash tree, sticks, little nests, sunflower seeds, and figs because that's what I found/had- but you could use whatever). For prep work, gather your supplies and divide them into containers. You'll be splitting the kids into small groups of 2 or 3, so make enough for each group (I used paper lunch bags to hold the supplies, and filled 11 bags).

Discussion: I had the kids close their eyes and think about things that are beautiful to them in nature. Answers included an acorn, a pet cat with only one eye, and flowers. We talked about what it was about those things that made them beautiful. The acorn, for instance, was little (size). The cat was soft (texture) and imperfect (imperfect things are often more special than perfect ones). The flowers were purple (colors). Then, we talked about how nature makes all kinds of patterns - giraffes, zebras, rows of leaves on a branch, etc. Pull up the slideshow, and after using our discussion questions - What do you see? What more can you find? What makes you say that? - see if you can ask the kids to identify some of the elements of art they came up with initially (size, color, texture, pattern) in the Goldworthy installations.

Andy Goldsworthy, Elder Leaves, 1983
Activity: We went outside the classroom on a patch of cement, and I gave the paper bags with supplies to each small group with instructions to make a design that was interesting and beautiful to them. We talked about maybe incorporating patterns (ABABAB, ABBAABBA) and noticing how the different colors look next to each other.


(These guys above focused on making patterns inside the nest, look closely. For the photograph, which is part of the art, they thought it would look neat to have all their hands shown.)


(This group used sticks to frame their nest, and then made piles by color around the nest. The diagonal stick across was a deliberate choice.)

The last part - I took pictures of all the "installations." (Practical tip: I also made sure to get one picture of each with a piece of paper with names of group members so I can get copies of the pictures into the right portfolios. I would totally forget!)  


Sunday, September 11, 2016

David Hockney Summer Swimmers

David Hockney, John St. Claire Swimming, 1972
(lesson notes: This lesson is from a lovely Australian art blog, Use Your Coloured Pencils, and the original post is here).

About the Artist: David Hockney (b. 1937) is an English Artist, considered by many to be England's most influential contemporary artist. He studied at the Royal Academy in London, and moved to California in 1964. During this time he made a series of paintings with swimmers that have become iconic pop art images. As the kids look at the paintings in this brief slideshow, encourage discussion and looking by asking open ended questions like, "what do you notice?" "what more can you find?" "what makes you say that?" Perhaps deepen the discussion by asking the kids about how you paint something that is constantly moving, like sunlight on water? (For more information on David Hockney, here's a quick article from the Tate)

Materials:
large drawing paper, sharpies, oil pastels, blue liquid watercolor + water to dilute, dixie cups, foam brushes (or large paintbrushes)

Activity:
On the drawing paper, ask the children to imagine themselves swimming, and then draw themselves with the oil pastels. Encourage them to make the drawing quite large, using a LOT of the paper (the tendency is often to make a teeny tiny little person on the big paper).  When they finish their drawing, have them outline their figures with sharpies for contrast... this step makes a big difference in their finished product. Then, have them use a white oil pastel to make squiggles all around their figure, and finally, use a bit of blue liquid watercolor diluted with water in a dixie cup to paint the paper around the swimmer. The white oil pastel will resist the watercolor, making a shimmery water effect. (Another variation is to sprinkle a bit of salt on the wet watercolored paper, but if you do this, make sure you are using a thicker watercolor paper rather than drawing paper).

Sunday, August 14, 2016

Louise Bourgeois Weaving

(FINISHED STUDENT PROJECTS)
from art-paperpscissors.blogspot.com

Untitled, 2003
Untitled, 2007
Untitled, 2007
Maman, 1999, Tate Modern in London
student work:

                                     
About the Artist:
Louise Bourgeois (1911-2010) was a beloved contemporary artist, famous for both her sculptures (the large iron Maman spiders) and her textile work. She was born and raised in France, the child of textile restorers, and studied math at the Sorbonne in Paris. After her beloved mother died, Louise abandoned math because what she needed to express she could not do through numbers. She moved to New York with her husband, had three sons, and made first textiles, then sculptures, finding success after opening a studio in Brooklyn. At 71, the Museum of Modern Art in New York had a retrospective of her work. She died at the age of 98, a working artist until the end. Of note: Bourgeois embraced the symbol of the spider as a way to show her loving feelings toward her mother. She described her mother as "deliberate...patient, soothing...subtle, indispensable...and as useful as an araignee" (spider) (quote from Louise Bourgeois' Ode a ma mere). Also said by Louise: "if you bash into the web of a spider, she doesn't get mad. She weaves and she repairs it." 

Materials:
-slideshow
-Cloth Lullaby: The Woven Life of Louise Bourgeois, by Amy Novesky and pictures by Isabelle Arsenault. (Lynne has a copy which she will happily loan out)

Fabric Version:
-Cardboard rectangle, 1 for each student, if doing the fabric variation
-fabric or ribbon, cut into 1" wide strips, length as long as your cardboard. You'll need a bunch! Ideally an assortment of colors and pattern.
-staplers

Paper Version:
-watercolor paper, paints, cups for water and brushes, optional salt
-a piece of construction paper for each child that has strips cut ALMOST all the way across - see the sample picture below
-scissors
-staplers

Activity:

Variation 1 - fabric (this is the project pictured in the first photo in this post). Read Cloth Lullaby to teach kids about Louise Bourgeois' life, and show them the selected pictures in the slideshow. Lead a discussion using the open-ended art questions: What do you see? What makes you say that? What more can you find? 

Have kids choose strips of fabric - long and short. (The amount they'll need depends on the size of your cardboard, but basically the goal is to have enough fabric strips to create a weaving that completely covers the cardboard). Have kids staple fabric strips, starting at the edges, along a top and side (the warp and the weft). Demonstrate how to create the simple weaving, by going over and under with the strips. Work from top to bottom, across. Once a strip is woven, staple the end.

Variation 2 - paper.  Using liquid watercolor and possibly salt for texture (kids sprinkle a small amount on the wet paint and it creates a neat, bubbly surface), have the kids each cover a 9x12 piece of watercolor paper in an abstract, loose wash.

source
While the papers are drying, read the story and discuss the pictures in the slideshow using the open-ended art discussion questions: What do you see? What makes you say that? What more can you find?  
Hopefully you have another helper with you :) who can be cutting each paper into horizontal strips as the paper gets dry enough.

Pass back the strips, letting the kids mix and trade, along with a piece of construction paper that has strips cut almost all the way across or down. Have kids weave the painted strips through the construction paper.  Once a strip is woven, staple the end.


SaveSaveSaveSave

Monday, November 2, 2015

Claes Oldenburg

Giant Hamburger, soft sculpture by Claes Oldenburg

CLAES OLDENBURG
b. 1927
genre: Pop Art
art project: collage
materials: scrap papers, cardboard, etc.; scissors and glue

Artist background and discussion:
Claes Oldenburg is a super famous and successful pop artist who makes large public sculptures in cities throughout the world as well as smaller soft sculptures. His focus is on monumentalizing (and sometimes satirizing) the objects that are significant parts of our daily lives (see the slideshowhttp://www.slideshare.net/GeorgeKellyArt/claes-oldenburg-54665270 for examples: a baseball bat in Chicago, an upturned ice cream cone in Germany, a big forkful of spaghetti). As you look at the slideshow of his work with the kids, you could prompt them on a discussion about what kind of things do we choose to make art from? Can art make you laugh or does it always need to be serious? Does it make you think differently about that big forkful of spaghetti to see it so large? If you were going to make a sculpture of your favorite thing, what would it be? (and, has anyone see the San Francisco Claes Oldenburg sculpture in person?)

Art Activity:
Based on this fun project, the goal is to make a collage of a big crazy sandwich. The kids should use papers with different textures and designs to create a sandwich that is visually appealing (or - better yet, just INTERESTING). Egg cartons work really well for the top and bottom bread, but be creative with the supplies and materials you offer the kids!

(image from itisartday.blogspot.com)


Sunday, March 8, 2015

Op Art

Cheryl Collins put together this great slideshow featuring op art - (optical illusion art) - which is always a big hit with the older grades.

See slideshow here.

Thursday, January 2, 2014

Bridget Riley: Op-Art


BRIDGET RILEY (1931 -)
Descending, 1965
Art Period: Op-Art, Modern
Art Activity: ink on paper
Materials: paper, fine tip black sharpies, or black ball point pens

Meet the Artist: British artist Bridget Riley (slideshow here) was Rachelle Smith's inspiration in creating this pen-and-ink experience. It was a hit - the kids enjoyed creating this optical illusion so much that many of them continued to experiment with making these drawings on their own after the lesson. See the slideshow for brief biographical information.

Discussion: Choose a picture from the slideshow and ask the discussion questions - 1. What do you see? 2. What makes you say that? 3. What more can you find?

Deepen the discussion by talking a bit about op-art - it's art created by putting lines together in a way that is meant to fool your eyes (creating an optical illusion). Do the pictures have actual movement? Or is it just a trick?

Activity: Within Rachelle's slideshow is a detailed step-by-step that really walks you exactly how to do this project.

Student Work:

Thursday, December 26, 2013

Wayne Thiebaud: Sweets


WAYNE THIEBAUD (1920 - )
Cakes, 1963
Pronounced: Tee-Bo
Art Style: Contemporary
Activity: Pastel
Materials: cardstock for template, scissors to cut the cardstock, large white paper, sharpies, and chalk pastels

Meet the Artist: Wayne Thiebaud is one of the California greats - famous for his paintings of beautifully arranged baked goods. This is a fun lesson for kids because it is so easy to relate to his happy art, and it's exciting to imagine row upon row of delectable cookies, pies, cakes, donuts, etc. It's also easy to customize for different ages. Slideshow here - (some simple facts about Mr. Thiebaud are included in the slide presentation). Additionally you can read about his life here and here.

Discussion: Focusing on Cakes, ask the discussion questions - (1) What's going on in this picture? (2) What makes you say that? (3) What more can you find?

To deepen the discussion, ideas you may want to bring out with the kids: (1) Thiebaud is a meticulous painter. Notice how all the shadows are exactly where they should be. Also notice how the shadows are all the same cool color, even if the cake that makes the shadow is bright (like that yellow cake in the very front). (2) Shapes - do you see any repeated shapes in this painting? (You may want to scroll through the other slides, and point out how repetition of shapes is something that Mr. Thiebaud does quite a bit - the pie painting...)

Activity: pass out cardstock squares and have the kids draw a shape of their choice with sharpie to be their template. Have them think of something sweet a la the paintings they saw in the slideshow - a lollipop, donut, cupcake, slice of pie, etc. (To do this in younger grades, you could have the templates already cut depending on the time you have). Then have the kids place the template on their white paper and outline their shape with sharpie. Have them repeat as they like on the page: show them how they can make rows, or whatever kind of pattern they like. Once the shapes are drawn, the children are to use the chalk pastels to fill in their shapes. Encourage older kids to include shadows, reminding them that the shadows all fall the same direction. (You might want to draw an example of this on the board)


Student Work:


Wednesday, December 25, 2013

Jim Dine Hearts


JIM DINE (1935 - )
Four Hearts, 1969
Pronounced: Dine
Art Style: Contemporary, Pop Art
Art Terms: symbol, repetition
Activity: Collage
Medium: Pastel and Watercolor
Materials: watercolor paper, construction paper, scissors, watercolors, brushes, cups for water, chalk or oil pastels, glue sticks

(*thanks, Gina Colbert, for sharing this lesson)

Slideshow Here

Meet the Artist: Here's a link to a brief article here, as well as the information in the slideshow (thank you Cheryl Collins!). 

Discussion Ideas: Focusing on the Four Hearts painting in the slideshow, ask the discussion questions - (1) What's going on in this picture? (2) What makes you say that? (3) What more can you find?

Additional ideas you may want to bring out in your discussion: Artists use color and subjects to express their ideas, just like how writers use words, or dancers use their bodies. Jim Dine has been painting and sculpting hearts over and over for years. What do you think he's trying to say by using the symbol of a heart in his works? What is a symbol? (an object that stands for an idea). What's the effect of showing the same symbol over and over? (...which is called repetition)

Activity: 
Set Up: Pass out watercolor pans, brushes, and one of each kind of paper to each child. Also, put 1 color of chalk pastel on every child's desk (they probably have glue sticks and scissors in their desk but you may want to check with teacher to be sure. You'll need these at the end for the last step).

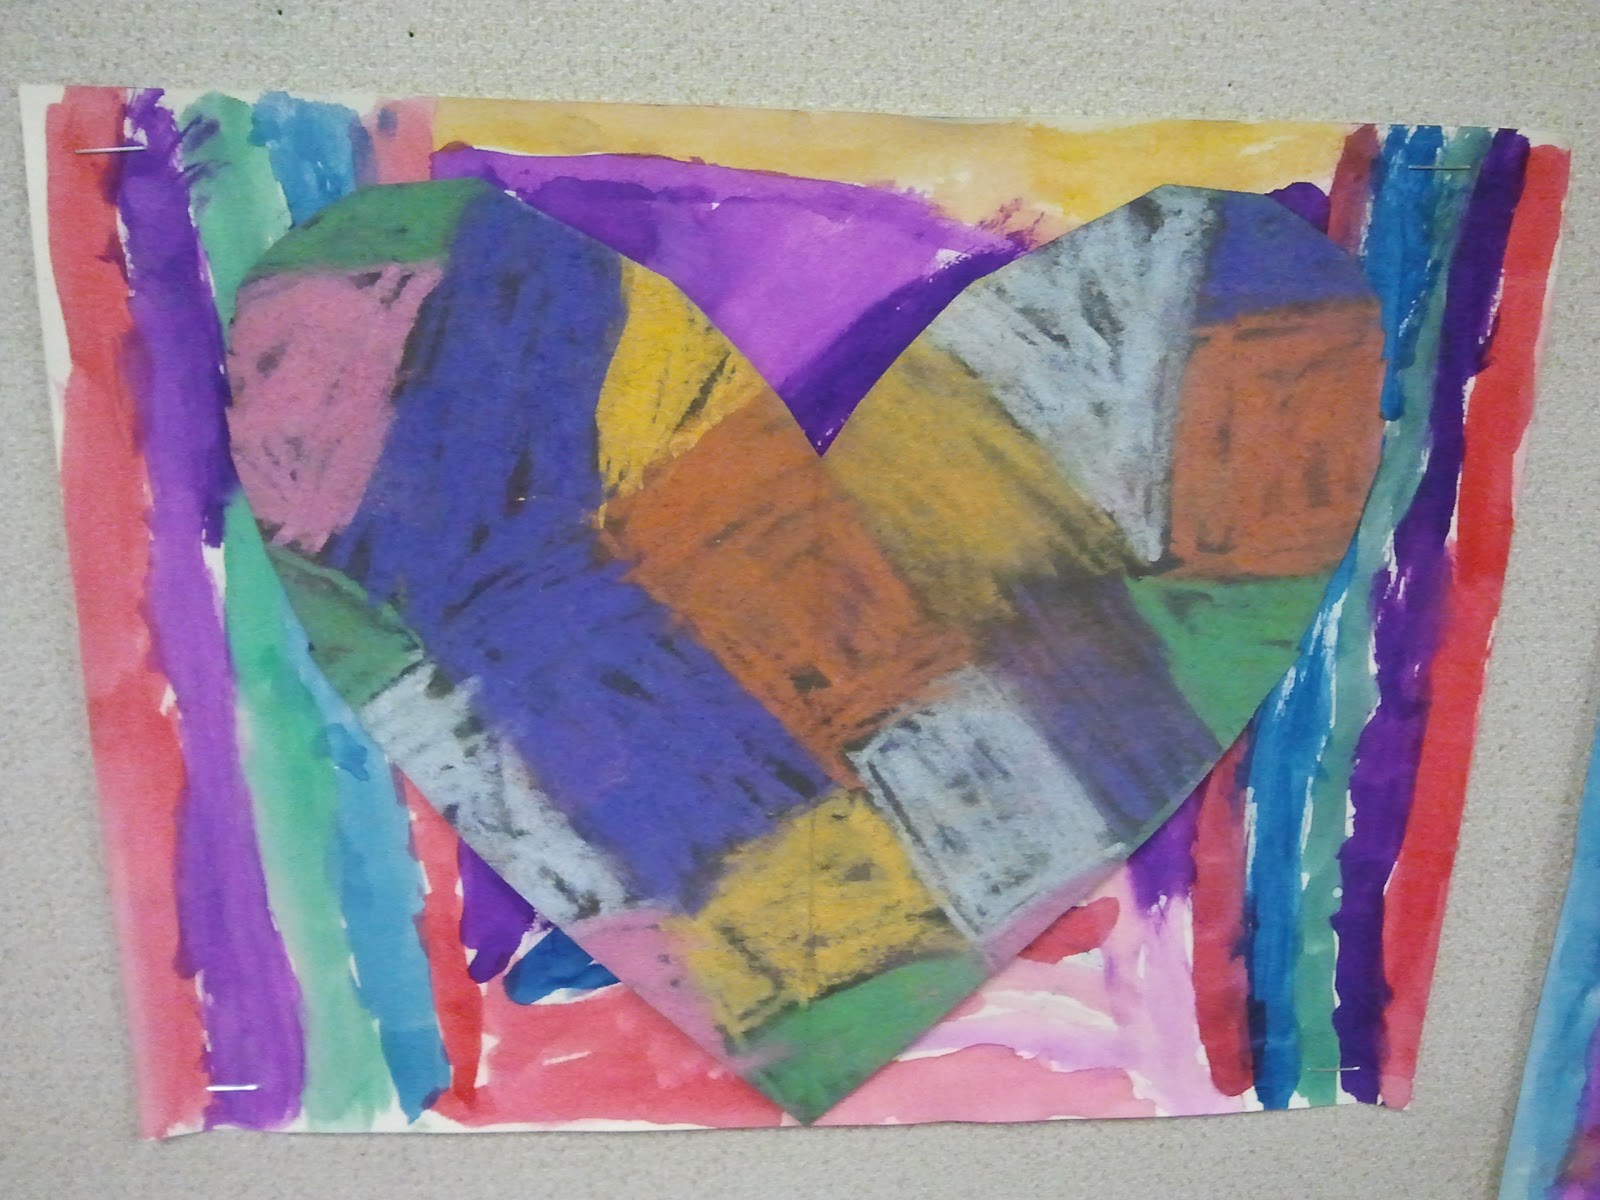
1. Have the kids make any kind of quick design they want on the watercolor paper using the watercolors. Just make sure they get the whole paper covered with color. (Filling it with color is the main goal here, rather than painting a picture)
2. While that dries, have them pick up their piece of chalk and draw a square on their black paper. When they finish their square, have them pass the chalk to their neighbor on the right and draw another square with their new piece of chalk. Do this as many times as you need to until the black paper is covered with colorful squares.
3. Have kids fold the black paper in half, and then draw half a heart shape. Cut and unfold to reveal the beautiful checkered heart.
4. Glue heart on watercolor paper, voila a Jim Dine masterpiece!

Student Work:


Tuesday, December 24, 2013

Jasper Johns (for younger grades)


JASPER JOHNS (1930 - )
Numbers in Color 1958-59
Art Terms: collage, complementary colors
Art Period: Contemporary
Medium: painting and collage 
Materials: liquid watercolors (blue, green, red, yellow); foam brushes, little bowls, newspaper, glue sticks, scissors, watercolor paper

Powerpoint: slideshow here

Meet the Artist: Jasper Johns  is an American pop artist, born 1930, who paints ordinary things (flags, numbers, targets, maps, etc) in ways that make the viewer notice them in new ways. Here's a brief article about Johns.

Discussion: Focusing on the Numbers in Color slide, use the discussion questions - (1) What do you see? (2) What makes you say that? (3) What more can you find?

You may want to bring out these ideas in your discussion: (1) What is the topic of this painting? (Numbers). Why do you think that Johns made a whole painting around numbers? How does the way he makes this make you think about numbers differently? Maybe scrolling through the other pictures in the slideshow can reinforce this idea of Johns using normal objects in ways that makes the viewer notice them in new ways. (2) Johns uses complementary - or opposite - colors (orange/blue; red/green). How do those colors affect each other? (They make each other really pop out).

Activity: This kindergarten lesson is based on an idea found on this blog. Click on the link for specific instructions. 

Student Work: